Tuesday, July 31, 2012

Sneak peek at my Korean cosmetic goodies!

The goodies from South Korea are here!  Finally!  I can't begin to tell you how excited I am.  Of course, I'm in a rush to try them all and report back to you; however, you have to be careful with skin products.


My personal standard is to wait about two weeks before passing judgment on skincare and foundations.  I want to see if the product breaks me out, if it brightens my skin, etc.  So, as much as I'd like to rush through these, you'll have to wait!


Right now I'm using the Missha concealer and Skin Food whitening cream.  I'll report on those ASAP.


What BB cream should I test first, y'all?!


XOXO


-K


P.S.
Feel free to email me at orangelipstickblog@gmail.com or tweet me at OrangeLipstickK


All items were purchased by Orange Lipstick for personal use and review purposes.

Milani Orange Gina is a rare gem


I have a confession.  The lipstick I'm reviewing today…well…I have three tubes of it.

Milani Color Perfect Lipstick in Orange Gina

I know, right?!  Crazy!  Most makeup mavens don't stockpile unless the product is limited edition (LE) or being discontinued.  However, this Holy Grail product was incredibly difficult for me to find in the first place!


Story time:  I saw this color on another blog (I don't remember which) and had to have it.  I tore up every CVS in a 15 mile radius and NONE of them have Milani lipsticks.  What the heck?!  So when I went to visit my BFF in Texas, I found one there and freaked out!  Unfortunately, there was only one tube.  *sad face*

Milani Color Perfect Lipstick in Orange Gina

Then, when looking at Milani nail polishes when I got back to my local CVS, I saw five tubes of lipstick crammed in a corner like some forgotten stepchildren.  Upon further inspection, I saw that two of the tubes were Orange Gina!  OMG!  I snapped those suckers up.

This power product is Milani Color Perfect Lipstick in Orange Gina.

 Milani Color Perfect Lipstick in Orange Gina
Milani Color Perfect Lipstick in Orange Gina

So, even though Orange Gina isn't discontinued or LE, I now have a mini stockpile.  Fortunately, this color is amazing in every sense.

 Milani Color Perfect Lipstick in Orange Gina
Milani Color Perfect Lipstick in Orange Gina

When I was picking a name for this blog, this lipstick just kept popping up in my mind.  It's everything I love:  orange, attention-getting, smooth, semi-opaque, and with coppery shimmer!  Just perfection.  The color is bright and vibrant with awesome staying power.  This is a surprising "neutral" because it looks good with almost any color of eyeshadow.  

This really sings on my pale skin and I bet it'd be gorgeous on really deep complexions.

I bought mine at two different CVS stores but you can nab it on Milani's website for $4.99.

XOXO

-K

P.S.
Feel free to email me at orangelipstickblog@gmail.com or tweet me at OrangeLipstickK

All items were purchased by Orange Lipstick for personal use and review purposes.

Sunday, July 29, 2012

Your brushes need love, too!


Do you wash your brushes?  If your answer is no, I'm going to put my fingers in my ear and hum loudly so I can pretend I didn't hear that.  If your answer is yes, then good for you!

Washing brushes is REALLY important.  Brushes pick up the oil and germs that are on your face, which can then fester and make a breeding ground for bacteria.  Eww!  That's not good for continued use on your face.  Having dirty brushes can lead to eye infections (~hurk~) or acne.  Plus, clean brushes help makeup application easier.

Washing brushes is simple!  I'm providing you with a step-by-step instruction guide complete with pictures.  Here we go!

Today I'm cleaning my e.l.f. Professional Bronzing Brush.  (I use this brush for blush, not bronzer.)


First, pick your favorite facial cleanser.  Some companies make brush shampoo but I all the ones I've used have irritated my eyes.  (e.l.f. was the worst offender.)  I've also heard of people using baby shampoo, which I've done before.  Honestly, facial cleanser works best for me but experiment with what works for you.  I use what I consider to be "The Classics":  Either Neutrogena Oil-Free Acne Wash or Cetaphil Daily Facial Cleanser.  These are both mild and don't irritate my skin.  (Don't use a facial cleanser that has any kind of beads or exfoliators.)


Put 1-2 pumps in a sink with warm water.  Be sure to agitate it so you get some bubbles.  Drop your brush in!


Let it sit for a minute and then swirl it around in the soapy water.  Add a pump of the facial cleanser to your palm and swirl the brush around in it.  Gently massage the brush head.


When you're done cleaning the brush head, rinse it out with lukewarm water.


Then, squeeze out the excess water with a  towel.  Make sure to shape the bristles back into their original shape.  


Finally, lay the brush flat on a towel to dry.  DO NOT store it in a cup because the water can settle into the base of the bristles.  This can lead to a destroyed brush - no good!


Shampooing your brushes every two weeks will keep the brushes (and your face!) in good condition!  As my mom would jokingly say, "That'll learn ya, dern ya!"

XOXO

-K

P.S.
Feel free to email me at orangelipstickblog@gmail.com or tweet me at OrangeLipstickK

All items were purchased by Orange Lipstick for personal use and review purposes.  This post contains affiliate links.

Reader Question: Preventing Fallout

I was thrilled when I received a question in my inbox from an Orange Lipstick reader!  I'm always eager to give my advice so please feel free to email them to me at orangelipstickblog@gmail.com.


Here's what she asked:


"I on occasion love to sport a eye shadow with some super sparkle to it but then end up with sparkles littered down my cheeks. NOT so cute when you're no longer in ... middle school? Is there a trick I can use to keep those sparkles on my eyelids where I put them in the first place? Thanks bunches." - H.B.


Here's my response:


Sparkles can be tricky! In makeup lingo, what you're talking about is called fallout. There are some steps to prevent it, though. 

First, are you using an eye primer? If you aren't, you should. I use Urban Decay Primer Potion and think its great. Ulta or Sephora will be glad to give you a sample so you can try before you buy. Other people swear by Too Faced Shadow Insurance, but I haven't tried it. 

Secondly, have you ever tried patting the makeup on rather than sweeping/brushing? Sometimes that can help. 

Also, try applying the shadow wet. Take a sponge tip applicator (I buy cheapie ones from the Dollar Store) and run it under the tap. Then, apply your eyeshadow with it. You'll be AMAZED at how much better the sparkles stay in place. Here's a comparison pic of Urban Decay Midnight Rodeo.


This is a swatch of Midnight Rodeo over NYX primer. The left is dry, the right is wet. Notice how much more glitter sticks around!  I actually blew on this a few times after I took the picture and only about two sparkles were left on the dry swatch.  All the sparkles on the right swatch were still there!

If all that fails, you may just have a bum product. Some shades just don't play nicely no matter what you try. 

Also, wait to apply your powder until after you apply your shadows. That way, you can usually brush off any fallout. 


Hope that helps and thanks for your question!  I love reader questions so don't be shy!


XOXO


-K


Please feel free to email me at orangelipstickblog@gmail.com or tweet me at orangelipstickk. 

Saturday, July 28, 2012

A sparkly party on my nails!


I have a very pretty NOTD for you today!


I started with my Orly Bonder base coat and then used one coat of China Glaze For Audrey.  This particular polish is the same color of a Tiffany's box!  However, the brush is uneven and scratchy.  Plus, I feel like this polish is a bit thick.  I prefer my polishes thinner and a little runnier.  Anyway, it's a nice polish!


Then I added one coat of Sephora by OPI Spark-tacular! Top Coat.  I wanted this product FOREVER but my Sephora never had it.  I finally got it and I've loved it!  It has pieces of multi-size, multi-shaped, multi-color glitter.  That's pretty much perfect in my book!


I finished up the whole thing with a coat of Seche Vite.  LOVE IT!

XOXO

-K

P.S.
Feel free to email me at orangelipstickblog@gmail.com or tweet me at OrangeLipstickK

All items were purchased by Orange Lipstick for personal use and review purposes.

Friday, July 27, 2012

A skincare miracle for under $5!


One of my Holy Grail beauty items is probably residing in your bathroom cabinet RIGHT NOW.  In fact, your mom, dad, grandpa, grandma, and best friend probably all have it in their bathroom cabinets, too.  

This item can be bought in any drugstore, grocery store, and maybe some gas stations.  It’s cheap, too:  I got mine for less than $5.

To call this item a miracle might be overstating it…but not by much.  It has positively revolutionized my skin.

By now you’re probably standing in front of your flung-open bathroom cabinets wondering what I’m talking about.  Here’s my secret…don’t tell anyone…

Milk of magnesia.  

(Photo taken from the Walgreens website)

That’s right, my HG skin-care miracle is used to relieve constipation.  Or in my case, excessive oiliness.  I first saw milk of magnesia blogged about by a guest writer named Sam on Makeup and Beauty Blog (HERE) and later on Pink Sith (HERE).  Figuring I had nothing to lose, I picked up a bottle of the generic stuff at my local Walgreens.  

Now, you have to understand that I have really oily skin.  Like, really oily.  I finish my makeup by 6:45 am each morning and my face looks like an oil slick by 8 am.  No amount of primers, powders, or mattifying foundations did anything.  You know those little blotting papers?  Yeah, I could fill up two to three of those a day…sometimes four.  It was gross.

(Photo taken from the Walgreens website)

That’s where milk of magnesia comes in.  I can’t even begin to explain to you the science behind how this works.  Like I said, it’s just a miracle.  In the morning, I use a small triangular sponge or a couple cotton balls to gently daub this on to my face.  You want to make sure you get a nice, thin layer over your entire face.  If you apply too heavily, you’ll get an eerie white cast to your face:  not cute.  Start with a small amount of the product and build.  I focus especially on my T-zone.  I tried to take before and after pictures; however, my camera just wasn't accurately showing just how much this product helped.

You’ll notice that your face is immediately made matte.  I’ll say that it takes about two weeks for this product to really reach full effectiveness; however, you’ll see results immediately!  The first day I did this, I didn’t need a blotting sheet until lunch time and even then I didn’t use the whole sheet.

After continued usage, you’ll find that your face is dramatically less oily.  Now I use one blotting sheet per day, right after work.  I find that this has even helped improve my skin quality:  On days that I don’t apply makeup, my face still doesn’t get oily as fast as it used to.

All in all, this is spectacular for us shiny-faced gals.  I don’t recommend it for normal to dry skin, as it could be irritating and drying.  As with any cosmetic, always do a patch test first to make sure this won’t irritate your skin.

Seriously, pick some up.  Or, better yet, just borrow a little bit from someone you know before committing to a whole bottle.  Either way, make it happen!  You won’t regret it!  

XOXO

-K

P.S.
Feel free to email me at orangelipstickblog@gmail.com or tweet me at OrangeLipstickK

All items were purchased by Orange Lipstick for personal use and review purposes.

Thursday, July 26, 2012

I'm confused by Jordana Splitting Image...


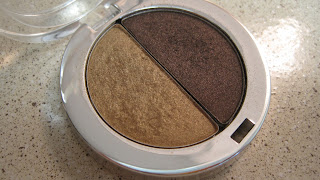
Today I’m giving you a budget option with Jordana Color Effects Powder Eyeshadow Duo in Splitting Image!  These little duos offer a lot of color variety for only $3.49 each (.094 oz).  Check out Jordana's website to see all the color offerings. 
Jordana Splitting Image

Now, my compact CLAIMS to be Splitting Image, but I have to say that it really doesn’t look like the picture on the website to me.  Jordana describes the shimmer shades as “Golden Beige” and “Brown with Gold Shimmer.”  

Jordana Splitting Image


Ummm…I definitely don’t see the shade on the left being “Golden Beige.”  It’s decidedly burnt gold to me.  It’s worth noting that I won this duo in a giveaway that Jordana was doing (yay for free stuff!) so maybe I got a mixed up one that didn’t have the right shade on the left…who knows.  (Also, I didn’t get to pick my duo – this is just the one they sent.)  


"Gold Beige" and "Brown with Gold Shimmer"

One thing I really like about this duo is that each color is separated into its own pan, not just mushed together.  I prefer to have my colors separate because I think it’s easier to get the color out without mixing them together.  Plus, if you’re interested in de-potting your makeup these would not be too difficult to extract.  The compact snaps shut nicely, which is something I appreciate because I feel that budget options sometimes don’t close very well.


The shade on the left is very buttery but the “Brown with Gold Shimmer” is a little drier.  These apply best with a sponge-tip applicator – brushes don’t tend to pick up the product as well.  The shades blend pretty easily; however, I had a problem with stacking on color.  I put a wash of the left shade on my eyelid and then the right shade in my crease.  Surprisingly, this seemed to make a lot of the gold shade disappear from my eye.  I tried to go back over it with NO result.  I tried packing and patting on the gold shade but it just wouldn’t stick.  Weird.


After eight hours of wear, I had minor creasing a major fading.  Both shades went buh-bye and I didn’t have much left.  I wore these shades over UDPP in Sin, which usually holds like crazy.  Guess UDPP and Jordana just weren’t getting along.

My personal makeup philosophy is to spend your money on good, solid shades that you’ll wear all the time.  For me that’s neutrals (beige, bronze, gold, etc.), purples, and mossy greens.  If I want an electric yellow shadow just for one specific look, I’m not going to shell out $18 for it.  That’s when I turn to drugstore options like Jordana.  Seriously, they have a duo with a lime green and bright lemon yellow!  That philosophy works for me, but maybe you have your own theory.

Personally, I would have preferred to receive one of the funky duos since I have higher-quality products in these shades.  If you are only into beauty buys I would still probably skip these – the fading is a no-go for me.  I’ve said it before and I’ll say it again:  Beauty buys aren’t worth the small amount of money if you’re never going to use them.

XOXO

-K

Feel free to email me at orangelipstickblog@gmail.com or tweet me at OrangeLipstickK


This product was won from a Jordana giveaway.


Wednesday, July 25, 2012

Makeup Idols!


The first question that people ask me as soon as I tell them that I’ve started beauty blogging is, “How did you even get into beauty blogging?  I didn’t even know there was such a thing!”

The best way to answer that question is to give you a little rundown of the beauty bloggers who inspire me and who I read daily.  These ladies work so hard to create quality blogs and that has inspired me to try to do the same.  I hope this list will encourage you to check out some of these incredible ladies AND add to your list of daily blogs to read!  (I know Orange Lipstick is at the top of that list, right?!)

The first beauty blog I ever got interested in was Makeup and Beauty Blog which is written by a beautiful tabby cat named Tabs.  Wait, what?  No, it’s actually written by his owner/caregiver/servant, Karen.  She is so punny and her writing always makes me happy.  Plus, you can’t beat the fact that so often her swatches are actually looks that she’s done.  I love that because sometimes things look much different swatched on your arm than on your eye.  You really need to check her out: HERE.

(Photo taken from MBB.  Image Source)

Once I was positively in a frenzy over MBB, I landed on Temptalia.  You would need to spend, oh, I don’t know…five solid months of your life catching up on all of Christine’s posts!  She is so detailed and always has the most amazing dupe lists.  She also has an incredible swatch gallery with super-easy sorting.  You can sort by product type, brand, and color.  Her work ethic seriously inspires me.  (Also, check out her foundation matrix!  It’s pretty revolutionary and can help you find all kinds of matches for your skin!)  Check it out HERE

(Photo taken from Temptalia.  Image Source)

I then branched out into nail blogs and my two favorites are Scrangie and Let Them Have Polish (LTHP).  Suffice it to say that both of these ladies have GORGEOUS nails:  so strong and clean.  I’m really, really jealous!  I love Scrangie’s basic pro-con lists because they’re so effective and really cut to the point.  Plus, I think she has amazing eyebrows.  Is that weird?  Scrangie isn’t exclusively nails – she reviews all sorts of things but I think her nail polish reviews are divine!  Cristina from LTHP delivers incredible nail swatches and she’s recently started doing eye of the day (EOTD) looks that are FIERCE.  Both of these ladies rock!

 (Photo taken from Scrangie.  Image Source)

(Photo taken from LTHP. Image Source)

My favorite blog is Musings of a Muse, which I’ve mentioned on O.L. several times.  She posts often, has a hilarious writing style, and covers lots of Asian brands.  Seriously…what’s not to love?  I think it’s great that she posts tons of pictures of up-coming products – seems like she always has an ear to the ground.  Love it.  Plus, she responds to so, so many of her reader comments.  I think that’s awesome because it really feels like a “community” around there!
(Photo taken from Musings of a Muse. Image Source)

Other favorites include Perilously Pale, Pink Sith, and Lipglossing.  Seriously, I can’t get enough!

So there you have it!  Are those all my favorites?  Of course not!  I read many, many more but I wanted to give you several that might serve as good “introductions” for you to the beauty blogging world.  Definitely check them out if you have time – I promise you’ll learn something and all of them have exceptional pictures.

I wanted to get into beauty blogging because I feel like it’s an incredible community.  I hope my blog ends up being half as good as the blogs of the people I admire!

XOXO

-K

P.S.
Feel free to contact me at orangelipstickblog@gmail.com or tweet me at OrangeLipstickK

Tuesday, July 24, 2012

Get Naked with Urban Decay!


It’s here!  It’s finally here!  

The much-buzzed-about Urban Decay Naked Skin Weightless Ultra Definition Liquid Makeup is here at last!

I can’t even tell you how pumped I am about this.  Urban Decay is my favorite brand EVER and I’ve been waiting with bated breath to finally meet this formula.  I’m seeing a trip to Sephora in my future!
(Photo taken from Sephora's website)

I really applaud Urban Decay for making a range of 18 colors that goes from very fair to very dark.  Making your range accessible to people of all skin tones is incredibly awesome in my book! 

(Photo taken from Urban Decay's website)


Of course, I always recommend grabbing a sample before you commit to any new foundation.  You need to make sure the product is a good color match and that it’s going to work on your skin type before committing.  My father says this about marriage, but I think it applies to foundation, too:  Marry Buy in haste, repent at leisure!

(Photo taken from Urban Decay's website)

Another option is to use the nifty tool on Urban Decay’s website that lets you input your current foundation and they’ll shade-match for you!  Neat!  I love that it takes the guess work out of the equation.  Of course, they don’t have many brand options and definitely no drug-store options.  However, I’ve been color matched to MUFE and Laura Mercier (as you saw in THIS POST).  Both MUFE HD Liquid 117 and Laura Mercier Silk Crème Foundation in Cream Ivory led me to Naked Skin 2.0.

(Photo taken from Urban Decay's website)

That leads me to the awesome naming system:  Naked Skin with cool undertones end in .5, while colors with warm undertones end in .0.  If you know your undertone, this can help you find your color.  If you don’t know your undertone, ask a professional the next time you’re at a makeup counter, Ulta, or Sephora.

Naked Skin is $38 for 1 fl oz.  You can buy through Urban Decay’s website – they’re currently having free shipping on all Naked products, so this might be a good time to pick up one of the Naked palettes if you haven’t yet!

XOXO

-K


P.S.
Feel free to email me at orangelipstickblog@gmail.com or tweet me at OrangeLipstickK